Application Layer Security
Account Security
User List
For the list of HWT-IVS1800 users at the application layer, see the HWT-IVS1800 Account List.
LDU User Management
- The LDU supports only the admin user.
- V7000-08A-LLM-P AI Pro, and V7000-08A-LLM-I AI Pro do not support the LDU.
Creating a User
This section describes how to create a maintenance user, for example, sysman, and add it to the management group admin.
- Log in to the operating system as the root user. (
 How Do I Log In to the Operating System Through a Network Port?)
 - Create management group admin.
groupadd admin
- Create the account sysman.
useradd -g admin -m -d /home/sysman -s /bin/bash sysman
In the preceding command, sysman indicates the user name, admin indicates the user group to which the user will be added, and /home/sysman indicates the user's home directory.
The parameters are described as follows:
-g: specifies a user group where a user will be added. Here, admin is specified.
-m: creates the specified home directory /home/sysman if it does not exist. This parameter is invalid if the directory exists.
-d: specifies the home directory for the user.
-s: specifies the shell type of the user.
- Set the password for the sysman user.
passwd sysman
If the following information is displayed, the password is successfully set:Changing password for sysman.
- Enable the function of forcible password change upon initial login for a specified user.
chage -d0 XXX (user name)

For example, after the chage -d0 test command is executed, the test user must change the password upon the first login.
Changing the Password
- Log in to the LDU as the admin user. (
 Logging In to the LDU)
 - Right-click a blank area on the screen and choose System Management from the shortcut menu.
- Choose .
You are advised to use a password with a high complexity. For details about the password rules, see Suggestions on Password Maintenance.
Changing the Password (CLI)
- Log in to the operating system as the root user. ( How Do I Log In to the Operating System Through a Network Port?)
- Change the password of the root user. To ensure account security, you are advised to change the default password upon initial login and periodically maintain password information.passwd root
Changing password for user root.
New password:    // Enter a new password. For details about the password rules, see Suggestions on Password Maintenance.
Retype new password:    // Confirm the new password.
passwd: all authentication tokens updated successfully.
The new password takes effect upon the next login.
- Change the password of the admin user by referring to the preceding steps.
passwd admin
- Change the password of the ivsoper user by referring to the preceding steps.
passwd ivsoper
- Enable the function of forcible password change upon initial login for a specified user. To ensure account security, you are advised to enable the function of forcible password change upon initial login and periodically maintain password information.
chage -d0 XXX (user name)

For example, after the chage -d0 test command is executed, the test user must change the password upon the first login.
Deleting a User
If a maintenance user is created for temporary use, you must delete this user when security maintenance is complete.
- Log in to the operating system as the root user. ( How Do I Log In to the Operating System Through a Network Port?)
- Delete the sysman user.
userdel sysman -r
Locking a User
Lock a user if you do not want to use the user for sometime.
- Log in to the operating system as the root user. ( How Do I Log In to the Operating System Through a Network Port?)
- Lock the sysman user.
passwd -l sysman
If the following information is displayed, the user is locked successfully:Locking password for user test. passwd: Success
Unlocking a User
You can unlock a locked user if necessary.
- Log in to the operating system as the root user. ( How Do I Log In to the Operating System Through a Network Port?)
- Unlock the sysman user.
passwd -u sysman
If the following information is displayed, the user is unlocked successfully:Unlocking password for user test. passwd: Success
Configuring the User Validity Period
- Log in to the operating system as the root user. ( How Do I Log In to the Operating System Through a Network Port?)
- Set the password validity period of the sysman user to 90 days and set the system to prompt the user to change the password seven days before the password expires.
passwd -x 90 -w 7 sysman
If the following information is displayed, the user validity period is successfully set:Adjusting aging data for user test. passwd: Success
Checking and Auditing Users
You are advised to periodically check the password validity and change a password if it is about to expire. Generally, the validity period of a password is 90 days.
- Log in to the operating system as the root user. ( How Do I Log In to the Operating System Through a Network Port?)
- Check the password validity period.
passwd -S sysman
The format of the command output is as follows:name status mm/dd/yy min max warn sysman PS 2020-01-14 0 90 7 35 (Password set, SHA512 crypt.)
The parameters are described as follows:
- sysman: user name.
- status: account status. The options are PS (passworded), LK (locked), and NP (no).
- 2020-01-14: current date.
- 0: minimum number of days after which a password can be changed.
- 90: number of days after which the password expires.
- 7: number of days in advance a user is notified that the password is about to expire.
If an account does not have a password, set a password immediately.
User Management on the OMU Portal
Adding a User
- Log in to the OMU portal as the admin user. (
 Logging In to the OMU portal)
 - Choose Users > Manage User.
- Click Add User.
- Configure user information.
You are advised to set the password based on the requirements illustrated in Suggestions on Password Maintenance.
- Log in to the OMU portal as the new user and change the initial password as prompted.
You are advised to use a stronger password. For details about password rules, see Suggestions on Password Maintenance.
Changing the Password
- Log in to the OMU portal as the admin user. ( Logging In to the OMU portal)
- Change the password based on the user role.
- admin user
- To change your own password:
Click admin in the upper right corner and choose Password Security.
- To change the passwords of other users with varied role permissions:
Choose . Then, click Reset Password in the Operation column in the row of the user whose password needs to be changed.
- To change your own password:
- Other users with varied role permissions
Click the user name displayed in the upper right corner and choose Password Security.
You are advised to use a password with a high complexity. For details about the password rules, see Suggestions on Password Maintenance.
- admin user

You can change the password at one time within a minimum interval of 5 minutes.
Disabling a User
- Log in to the OMU portal as the admin user. ( Logging In to the OMU portal)
- Choose Users > Manage User.
- Click Disable in the Operation column.
Deleting a User
- Log in to the OMU portal as the admin user. ( Logging In to the OMU portal)
- Choose Users > Manage User.
- Click Delete in the Operation column.
Enter the password of the current logged-in user and click OK to verify the password.
Access Control
Traffic Control
When traffic control is triggered upon system overload, calls can be rejected to ensure running of some services and implement system recovery. Traffic control is a key measure for preventing system breakdown.
System Access Control
The access control mechanism enables the system to check and authorize the external access requests. Through access control, you can prevent unauthorized users from logging in to devices and authorized login users from performing operations beyond their rights.
Firewall Access Control
Firewall access control is implemented based on access control lists (ACLs). An ACL defines data streams on a network by using the source IP address, destination IP address, port number, and upper-layer protocol. The ACL serves as the basis of applications such as quality of service (QoS) and policy-based routing.
Type |
Description |
|---|---|
Basic ACL |
A basic ACL defines data streams by source IP address. |
Advanced ACL |
An advanced ACL defines data streams by a combination of elements such as the source IP address, destination IP address, source port number, destination port number, and upper-layer protocol. |
- Disable SSH ports on the firewall if SSH-based login from the extranet is not required.
- Configure an IP address trustlist on the firewall to allow only the cameras, OMU portal, , and other devices with trustlisted IP addresses, to access.
Configuring Trusted IP Addresses to Control Access Permissions
- Preventing slow attacks
- The HTTPS/HTTP service involves OMU portal provided for users. Slow attacks deteriorate system performance. You need to enhance network control to reduce slow attacks initiated by malicious users using the HTTPS/HTTP protocol.
- When a potential HTTP slow attack exists, the system administrator can run the netstat -a command provided by the operating system to check the connection status, check whether a suspicious client initiates a slow attack to the HTTPS/HTTP service, and restrict HTTPS/HTTP access of the suspicious client on the firewall.
For example, if port 80 provides the HTTP service, run the following command to restrict HTTP access of the suspicious client: iptables -A INPUT -p tcp --syn --dport 80 -m connlimit --connlimit-above 100 -j DROP
- On a network with high security requirements or with weak network control, it is recommended that a professional anti-distributed denial of service (Anti-DDoS) device be deployed at the egress of the server to prevent malicious users from initiating HTTP slow attacks to the server.
- Configuring an IP address trustlist
You can configure trusted IP addresses to control user access to the OMU portal.
ACL Rule Configuration
To defend against IP attacks from the external networks for enhanced system security, you can run commands to determine which packets can be received or rejected by the system based on networking and link configuration. An ACL rule is used to define the packets to be received or rejected based on the setting of the protocol type, local IP address, peer IP address, local port, and peer port.
For details about the ports, see the following attachment:
Communication Matrix
Login Security
Login security policies are configured to prevent unauthorized users from logging in to the system.
LDU Security Policies
Security Policy |
Description |
Default Setting |
Operations |
|---|---|---|---|
User identity authentication |
You can log in to the system only after the entered user name and password are authenticated. |
Enable |
N/A |
Account locking policy |
|
Enable |
N/A |
Password change at the first login |
The system prompts you to change the password upon the first login. If you do not change the password, you cannot log in to the system with the initial password again. |
Enable |
N/A |
Logout upon timeout |
By default, the system enables the function of logout upon timeout. If no action signal (clicking the mouse or pressing the keyboard) is received within 5 minutes, the system automatically logs out. This improves system security. |
Enable |
|
Screen lock upon timeout (on the live video viewing or recording playback page) |
After LDU Timeout Interval (min) is set, if no action signal (clicking the mouse or pressing the keyboard) is received within the specified period, the system automatically locks the screen, but the live video viewing or recording playback continues. You can click any area on the GUI and enter the login password to unlock the screen. |
Disable |
|
 in the upper left corner.
 in the upper left corner.
OMU Portal Security Policies
Security Policy |
Description |
Default Setting |
Operations |
|---|---|---|---|
User identity authentication |
You can log in to the system only after the entered user name and password are authenticated. |
Enable |
N/A |
Account locking policy |
If you fail to log in for three consecutive times, the system automatically locks the account for 5 minutes. |
Enable |
N/A |
Password change at the first login |
The system prompts you to change the password upon the first login. If you do not change the password, you cannot log in to the system with the initial password again. |
Enable |
N/A |
Repeated login restriction |
You cannot log in to the system from multiple devices concurrently. |
Enable |
N/A |
iClient S100 Security Policies
Security Policy |
Description |
Default Setting |
Operations |
|---|---|---|---|
User identity authentication |
You can log in to the system only after the entered user name and password are authenticated. |
Enable |
N/A |
Screen lock upon timeout (on the live video viewing or recording playback page) |
After Auto-Lock Screen is set, if no action signal (clicking the mouse or pressing the keyboard) is received within the specified period, the system automatically locks the screen, but the live video viewing or recording playback continues. You can click any area on the GUI and enter the login password to unlock the screen. |
Disable |
|

Log Check and Audit
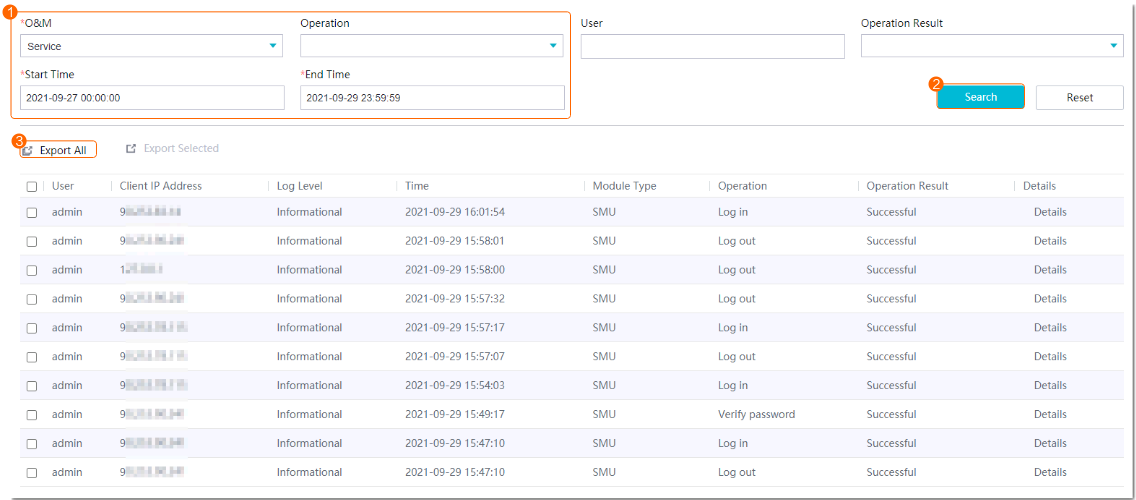
Collecting Security Logs
Context
Security logs record user login, logout, authorization, and authentication information.
Procedure
- Log in to the OMU portal as the admin user. ( Logging In to the OMU portal)
- Choose Maintenance > Log Manage > Security Logs.
- Collect security logs, as shown in Figure 6-31.
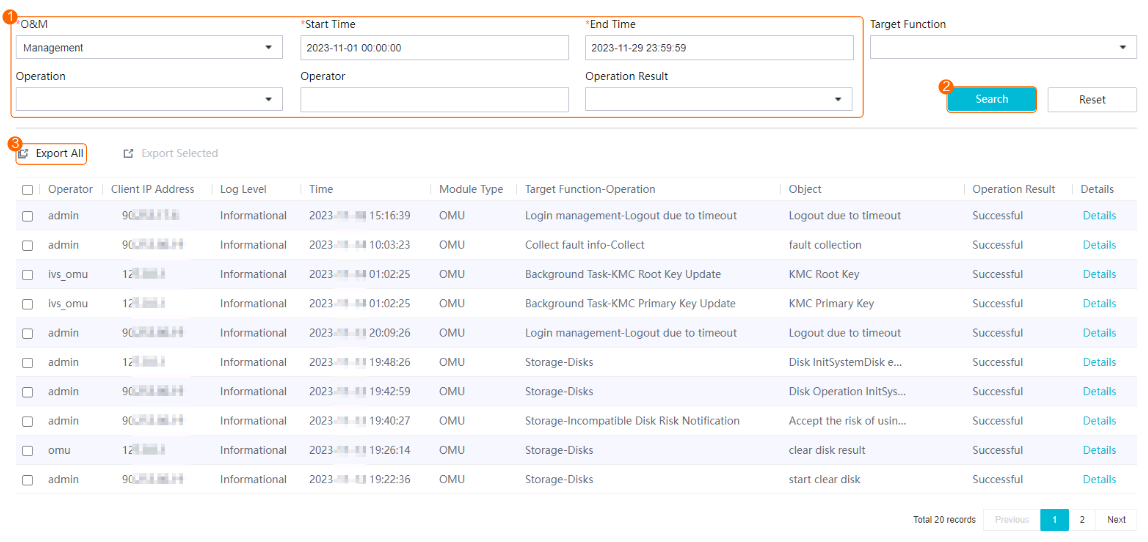
Collecting Operation Logs
Context
Operation logs record the following:
Information about execution initiated by the system administrator and service administrator.
Log information generated during system maintenance.
Procedure
- Log in to the OMU portal as the admin user. ( Logging In to the OMU portal)
- Choose Maintenance > Log Manage > Operation Logs.
- Collect operation logs, as shown in Figure 6-32.
Collecting Run Logs
Context
Run logs record the following:
Log information generated by scheduled tasks in the system
System running status and key information about service processing
Log information generated during interface data exchange between internal subsystems and between the device and service systems
Procedure
- Log in to the OMU portal as the admin user. ( Logging In to the OMU portal)
- Choose .
- Collect run logs, as shown in Figure 6-33.
- After the fault information is collected successfully, download the fault information to your local computer.
The downloaded fault information is a .tgz package. Decompress the package to extract the log and config folders. The log folder stores the log information and the config folder stores the module configurations.

Security Supervision
Security Alarm
The system reports event information to the security alarm management system when detecting an event or behavior that does not comply with the security alarm policy so that the administrator can handle the event or behavior in a timely manner to eliminate potential security risks. The information reported to the security alarm management system includes alarm sources, time when alarms are generated, alarm causes, and alarm severity. Currently, the following security alarms are supported:
- ALM-308521124A User locked forcibly
- ALM-308521127 IP address locked forcibly
User Management
In routine operation and maintenance, the system administrator can manage users on the OMU portal to detect abnormal login information (based on logs) in a timely manner. For example, an account is frequently used for logging in to or out of the system, an account is used on multiple terminals with different IP addresses, or an account is frequently used for risky operations. After detecting a suspicious account, the system administrator can analyze and forcibly suspend the account if it may threaten the system security.
User management of the OMU portal consists of user information query and forcible account suspension.
User information query: The system administrator can query the information about all users in the system, including:
User name
User role
PTZ control priority
User status
Forcible account suspension: When detecting an abnormal account, the system administrator can forcibly suspend the account.