NTP Synchronization
Feature Description
Definition
Devices synchronize time with a specified device or external clock source to ensure time consistency.
Customer Benefits
This feature ensures the time consistency between frontend devices and backend devices as well as between software and hardware of devices.
Application Scenario
- The device synchronizes time with an external clock source.
- Cameras synchronize time with the device.
- The software and hardware time of the device is synchronized.
Requirements
NE |
Version Requirement |
License Requirement |
Function |
|---|---|---|---|
HWT-IVS1800 |
11.1.0 and later versions |
N/A |
Provides the NTP time synchronization function. |
Application Limitations
- For details about the cameras that support NTP time synchronization, see the HWT-IVS1800 Compatibility List.
- If no NTP server is available, time synchronization is configured on the HWT-IVS1800, and the offset is less than 2s in the period of 24 hours.
Feature Configuration
Scenario Description
NTP Deployment Principles
Many solutions are deployed and the time difference exists between devices. In this case, it is difficult to analyze faults of devices based on the time. As such, NTP is required for time synchronization between devices.
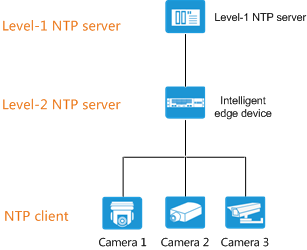
Customer Provides the NTP Server
Figure 4-1 shows the scenario where the customer provides the NTP server.
- The HWT-IVS1800 synchronizes time with the NTP server.
- For details about how the , see Configuring Time Synchronization with the NTP Server for the .
- The cameras synchronize time with the HWT-IVS1800.
- For details about how to configure time synchronization for HWSDK- or ONVIF-compliant cameras, see Procedure (HWSDK/ONVIF).
- For details about how to configure time synchronization for GB/T 28181- or RTSP-compliant cameras, see Procedure (GB/T 28181 or RTSP).
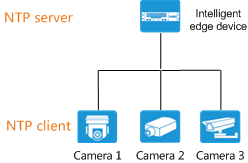
Customer Does Not Provide the NTP Server
Figure 4-2 shows the scenario where the customer does not provide the NTP server.
In this scenario where the HWT-IVS1800 functions as the NTP server, you need to manually configure the time and then time synchronization of the HWT-IVS1800. The HWT-IVS1800 that functions as the NTP server needs to synchronize time to the cameras.
- Time synchronization is configured on the HWT-IVS1800. For details, see Configuring Time Synchronization with the NTP Server for the .
- The cameras synchronize time with the HWT-IVS1800.
- For details about how to configure time synchronization for HWSDK- or ONVIF-compliant cameras, see Procedure (HWSDK/ONVIF).
- For details about how to configure time synchronization for GB/T 28181- or RTSP-compliant cameras, see Procedure (GB/T 28181 or RTSP).
Configuring Time Synchronization with the NTP Server for the
Context
- If the NTP server is configured for the first time, the forcibly synchronizes time from the NTP server. If the time on the NTP server is saved for multiple times, forcible time synchronization is triggered only upon the first-time saving.
For example, if the time on the NTP server is 2020-11-11 11:11:11, the time of the will be forcibly synchronized to 2020-11-11 11:11:11 after time synchronization with the NTP server is configured.
- After the NTP server is configured, the time synchronization rules are as follows:
- If the time difference between the and the NTP server is within 600 seconds, the synchronizes time with the NTP server by 0.5 milliseconds per second.
In this scenario, the synchronization of 600 seconds takes about 14 days in total.
- If the time difference between the and the NTP server exceeds 600 seconds, the will not synchronize time with the NTP server.
- If the time difference between the and the NTP server is within 600 seconds, the synchronizes time with the NTP server by 0.5 milliseconds per second.
Procedure (on the OMU Portal)
- Log in to the OMU portal as the admin user. (
 Logging In to the OMU portal)
 - Choose .
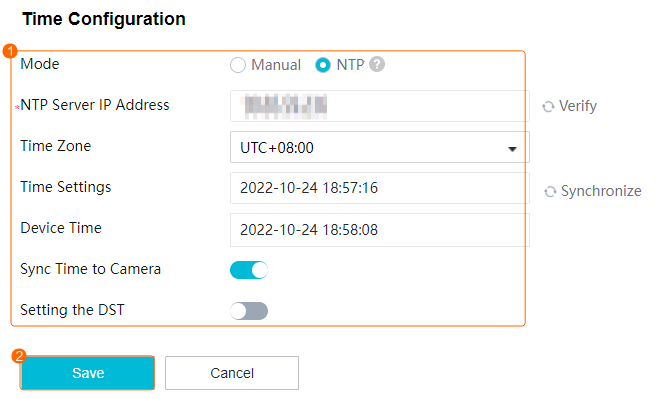
- Configure time information of the server.
If an NTP server is configured, synchronize the time from the NTP server, as shown in Figure 4-3.
Table 4-4 describes the parameters.
Table 4-4 Parameters/Buttons for automatic time synchronization with the NTP serverParameter/Button
Description
NTP Server IP Address
IP address of the NTP clock source server. The value can be an IPv4 or IPv6 address. After the IP address is set, the device synchronizes time with the clock source.
If you click Verify, the system will check whether the communication with the clock source is normal.
NOTE:If Synchronize System Time With PUBLIC CLOUD is toggled on, NTP time synchronization previously configured for the HWT-IVS1800 (if any) will turn invalid.
Time Zone
Current time zone of the device.
Time Settings
Device time. You can manually change the time.
If you click Synchronize, the time is manually synchronized with the NTP server.
Device Time
Current server time.
Sync Time to Camera
Indicates whether to synchronize the server time to the camera connected to the device.
NOTE:Cameras connected through HWSDK or ONVIF automatically time-synchronize with the server. For cameras connected through GB/T 28181 or RTSP, you need to separately configure time synchronization in the camera web system.
Setting the DST
Indicates whether to enable DST. If DST is used locally, toggle on this parameter.
After the DST is configured, the time zone cannot be changed. Therefore, set the time zone before setting the DST. If you need to change the time zone after setting the DST, disable the DST first.
Week
DST mode.
Date
Start Time
Start time of the DST.
End Time
End time of the DST.
Offset Time
Offset time of the DST.
Save
Button for saving all settings. After you click this button, the system automatically checks the current NTP server status of the device (specified by Local Status).
- NTP Online
- NTP Abnormal
Cancel
Button for restoring data to the state last saved.
- If no NTP server is deployed onsite, you need to manually configure time and then time synchronization of the HWT-IVS1800.
- Choose and check the IP address of the device.
- Choose and configure the time correctly, as shown in Figure 4-4. Table 4-5 describes the parameters.
Table 4-5 Parameters/Buttons for manual time configuration
Parameter/Button
Description
Time Zone
Current time zone of the device.
Time Settings
Device time. You can manually change the time.
Device Time
Current server time.
Sync Time to Camera
Indicates whether to synchronize the server time to the camera connected to the device.
NOTE:Cameras connected through HWSDK or ONVIF automatically time-synchronize with the server. For cameras connected through GB/T 28181 or RTSP, you need to separately configure time synchronization in the camera web system.
Setting the DST
Indicates whether to enable DST. If DST is used locally, toggle on this parameter.
After the DST is configured, the time zone cannot be changed. Therefore, set the time zone before setting the DST. If you need to change the time zone after setting the DST, disable the DST first.
Week
DST mode.
Date
Start Time
Start time of the DST.
End Time
End time of the DST.
Offset Time
Offset time of the DST.
Save
Button for saving settings.
Cancel
Button for restoring data to the state last saved.
- Set Mode to NTP, set the IP address of the NTP server to the IP address of the device, and click Save.
- Enter the password of the current login user and click OK to verify the password.

Procedure (on the LDU)
- Log in to the LDU as the admin user. (
 Logging In to the LDU)
 - Click
 in the upper left corner to access the main menu.
 - Choose .
- Configure NTP time synchronization.
- If an NTP server is deployed onsite, synchronize time with the NTP server, as shown in Figure 6-68.Figure 4-5 Configuring NTP time synchronization

- If no NTP server is deployed onsite, you need to manually configure time and then time synchronization of the HWT-IVS1800.
- Choose and check the IP address of the device.
- Choose , configure the time correctly, and click Save.
- Click Sync with NTP server, set the IP address of the NTP server to the IP address of the device, and click Save.
- If an NTP server is deployed onsite, synchronize time with the NTP server, as shown in Figure 6-68.
Configuring Time Synchronization from a Camera to the HWT-IVS1800
Context
HWSDK- or ONVIF-compliant cameras can automatically synchronize time with the HWT-IVS1800.
For GB/T 28181- or RTSP-compliant cameras, you need to configure time synchronization with the HWT-IVS1800 one by one.
Important Notes
- If the cameras are connected to the device through HWSDK or ONVIF, configure time synchronization by referring to Procedure (HWSDK/ONVIF).
- If the cameras are connected to the device through GB/T 28181 or RTSP, configure time synchronization by referring to Procedure (GB/T 28181 or RTSP).
Procedure (HWSDK/ONVIF)
- Log in to the OMU portal as the admin user. ( Logging In to the OMU portal)
- Configure cameras to synchronize time with the HWT-IVS1800 in either of the following ways:
- On the Time Configuration page (The time synchronization function is enabled by default on this page):
- Choose System > Time Configuration.
- Toggle on Sync Time to Camera and click Save.

If Sync Time to Camera is toggled on under on the OMU portal, the system automatically restarts the SCU module and resets NTPIPC to 0.
- On the Advanced Configuration page:
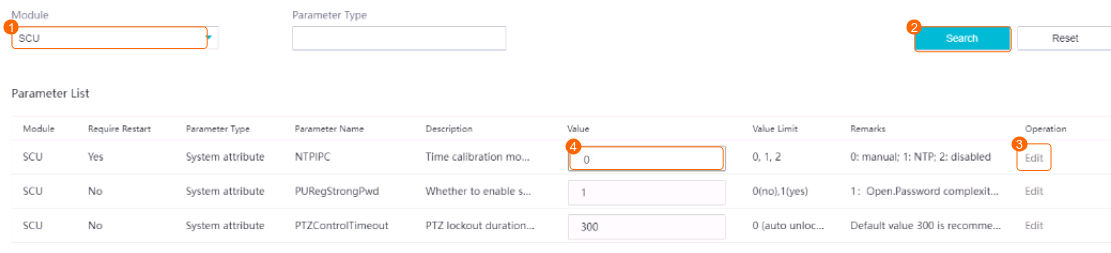
- Choose System > Advanced Configuration.
- Set NTPIPC to 0 (default), as shown in Figure 4-6.
After NTP time synchronization is enabled for a camera, the camera automatically synchronizes time with the HWT-IVS1800.
- (Optional) Configure the post-NAT IP address of the HWT-IVS1800, as shown in Figure 4-7. This step is required only when the HWT-IVS1800 is located on an intranet.
- On the Time Configuration page (The time synchronization function is enabled by default on this page):

Procedure (GB/T 28181 or RTSP)
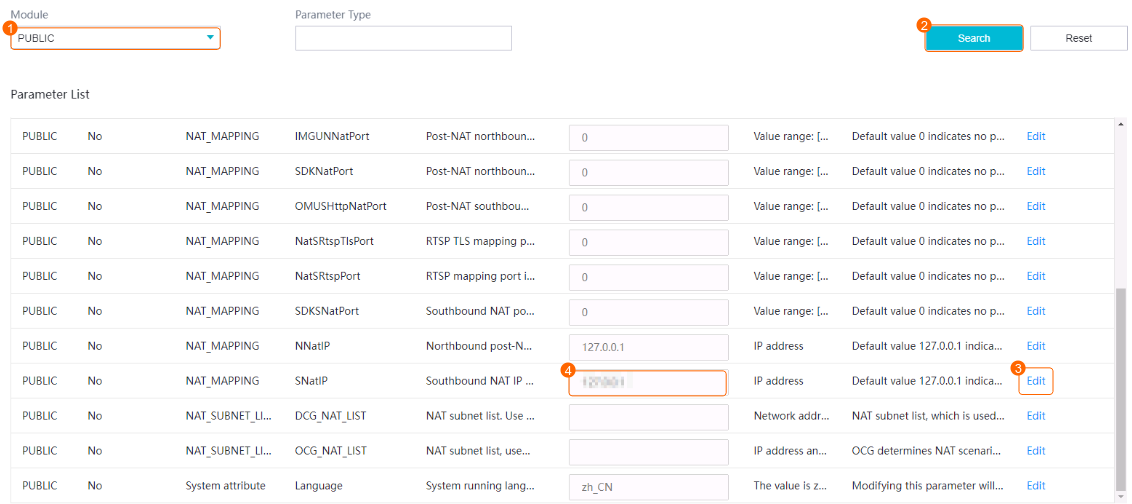
- (Optional) Configure the post-NAT IP address of the HWT-IVS1800. This step is required only when the HWT-IVS1800 is located on an intranet.
- Log in to the OMU portal as the admin user. ( Logging In to the OMU portal)
- Choose System > Advanced Configuration.
- Set PUBLIC parameters, as shown in Figure 4-8.
- Log in to the OMU portal as the admin user. (
- Log in to the camera web system as the admin user. (
 Logging in to the Camera Web System)
 - Choose Settings > System > Time.
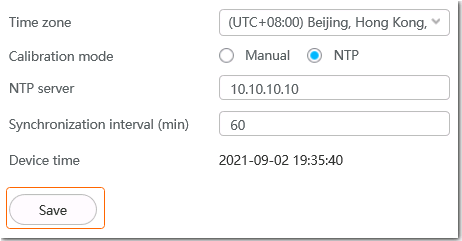
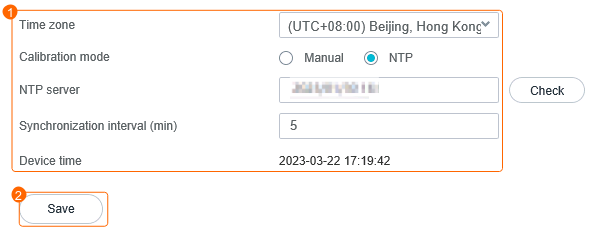
- Configure NTP time synchronization, as shown in Figure 4-9.
Table 4-6 describes the parameters.
Table 4-6 Parameter descriptionParameter
Setting
Time zone
Select the time zone where the HWT-IVS1800 is located.
Calibration mode
Select NTP.
NTP server
Enter the actual IP address of the HWT-IVS1800.
Check
Check whether the network connection between the camera and the NTP server is normal.
Synchronization interval (min)
Set the interval for the camera to synchronize time with the HWT-IVS1800 as required.
The camera automatically synchronizes time with the HWT-IVS1800 at the synchronization interval.
Verification
- Log in to the camera web system as the admin user. ( Logging in to the Camera Web System)
- Choose Settings > System > Time.
- View the current time of the camera, as shown in Figure 4-10.
- Check whether the device time is the same as the time of the HWT-IVS1800.
If not, reconfigure NTP time synchronization for the camera.