OMU Portal
- What Do I Do If Chinese Characters Appear on the English GUI of the OMU portal?
- What Do I Do If I Fail to Access Some Sections of the OMU portal Online Help?
- How Do I Restart Service Modules?
- How Do I Collect Fault Information?
- How Do I Check the Device Version?
- How Do I Check the Version of the Device Whose Data Is Backed up in the Data Safe?
- How Do I Configure Connection to the SMTP Server?
- What Do I Do When the Account for Logging in to OMU portal Is Locked?
- What Do I Do When Data on the System Disk Is Lost?
- What Do I Do When I Fail to Initialize Hard Disks?
- What Can I Do If the Login Page Is Displayed Abnormally or a Message Indicating Incorrect Password Is Displayed Upon Login?
- How Do I Change the Security Questions?
- How Do I Retrieve the System Password?
- How Do I Manually Format a Failed Disk to Rectify File System Faults?
- How Do I Install a Large Model Algorithm Package?
What Do I Do If Chinese Characters Appear on the English GUI of the OMU portal?
Possible Causes
The GUI language information is saved in the cookie, and the default language is Chinese. If you clear the cookie when the OMU portal does not exit and then perform operations on the OMU portal (for example, clicking a node in the device tree and refreshing the node information), the fault will occur.
Solution
Log out of the system. Select English on the login page and log in again.
What Do I Do If I Fail to Access Some Sections of the OMU portal Online Help?
Possible Causes
The Google Chrome Frame plug-in is installed on your computer. The plug-in is incompatible with Internet Explorer.
Solution
Access the control panel, click Programs and Features, uninstall the Google Chrome Frame plug-in, and re-open Internet Explorer.
How Do I Restart Service Modules?
Procedure
- Log in to the OMU portal as the admin user. (
 Logging In to the OMU portal)
 - Choose .
- Restart service modules, as shown in Figure 6-96.
- To restart all services, select all service modules and click Restart in the upper left corner.
- To stop a service module, click Stop in the Operation column of the service module.

How Do I Collect Fault Information?
Procedure
- Log in to the OMU portal as the admin user. ( Logging In to the OMU portal)
- Select a module for fault collection.
- Click Start Collection, as shown in Figure 6-97.
- To collect fault information about multiple modules simultaneously, select all of them.
- After fault information collection is complete, click Download. The fault information is stored to the local computer.

How Do I Check the Device Version?
Procedure
- Log in to the OMU portal as the admin user. ( Logging In to the OMU portal)
- View the current system version under Home > Device Info.
How Do I Check the Version of the Device Whose Data Is Backed up in the Data Safe?
Procedure
- Log in to the OMU portal as the admin user. ( Logging In to the OMU portal)
- Choose .
- In the Restored-To Time Points area, view the version of the device whose data is backed up in the Data Safe.
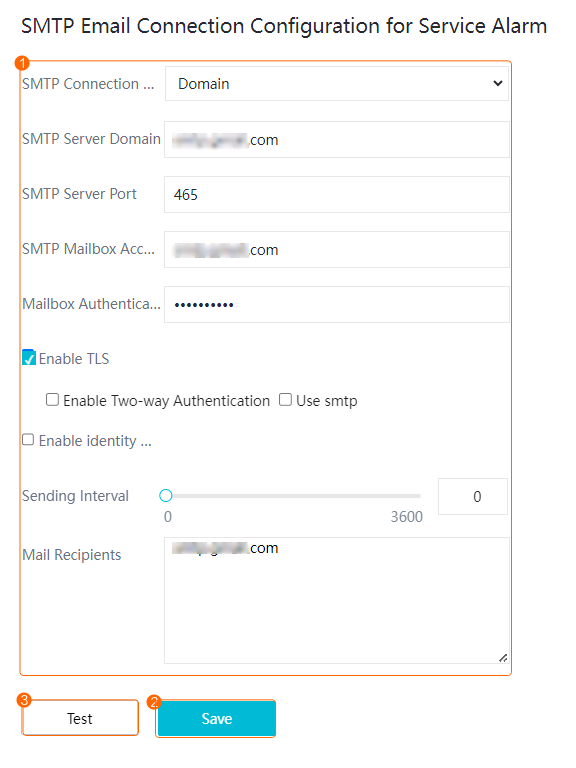
How Do I Configure Connection to the SMTP Server?
Prerequisites
The network between the HWT-IVS1800 and the SMTP server is normal.
Procedure
This section describes how to set SMTP parameters on the OMU portal. For details about how to set the type of service alarms that trigger the action of sending emails on the iClient S100, see in the iClient S100 User Manual.
- Enable SMTP for the mailbox and obtain the authorization code.
- Configure email connection on the OMU portal.
- Log in to the OMU portal as the admin user. ( Logging In to the OMU portal)
- On the page that is displayed, choose .
- Set SMTP parameters, as shown in Figure 6-98. Table 6-32 describes key parameters.
Table 6-32 Description of key parameters
Mailbox
SMTP Server Domain
SMTP Server Port
Enable TLS
Enable Two-way Authentication
Use SMTP
Enable Identity Authentication-based Login
QQ Mail
smtp.qq.com
465
-
-
-
√
163 Mail
smtp.163.com
465
√
-
-
-
126 Mail
smtp.126.com
465
√
-
-
-
Sina Mail
smtp.sina.com
465
√
-
-
-
Outlook
smtp-mail.outlook.com
587
√
-
√
-
Gmail
smtp.gmail.com
465
√
-
-
-
Zoho Mail
smtp.zoho.com.cn
465
√
-
-
-
Table 6-33 Parameters for connecting to the SMTP server for service alarmsParameter
Description
SMTP Connection Mode
Mode for connecting to the SMTP server.- Domain (available only when TLS is enabled)
- Service IP Address (available when TLS is enabled or disabled)
SMTP Server Domain
IP address or domain name of the SMTP server.
The domain name of the SMTP server varies depending on the mailbox. For details, contact the mailbox provider.
NOTE:Currently, only 163 Mail, 126 Mail, QQ Mail, Sina Mail, Gmail, Outlook, and Zoho Mail can be connected.
SMTP Server Port
Port number of the SMTP server.
The default value is 25. The port number of the SMTP server varies depending on the mailbox. For details, contact the mailbox provider.
SMTP Mailbox Account
Account for logging in to the mailbox to which service alarms are to be sent.
Mailbox Authentication Code
SMTP authorization code for authorizing a mailbox to receive service alarms, which must be the same as that obtained from 1.
Enable TLS
Indicates whether to enable TLS.NOTE:You are advised to select Enable TLS because security risks may be imposed if you do not select it.
Enable Two-way Authentication
Indicates whether to enable email two-way authentication by referring to Table 6-32.
Use smtp
Indicates whether to enable SMTP by referring to Table 6-32.
Enable identity authentication login
Indicates whether to enable identity authentication-based login by referring to Table 6-32.
Sending Interval
Interval for sending service alarms of the same type. If you set this parameter to 0, a service alarm is sent by email immediately after it is generated.
If this parameter is set to 30, intrusion detection and loitering detection are selected as alarm types, and three intrusion alarms and four loitering alarms are generated in 30s, the system sends only two alarm emails within 30s, one for the first intrusion alarm and the other for the first loitering alarm.
Mail Recipients
Default email addresses for receiving service alarms.
If there are multiple email addresses, use semicolons (;) to separate them.
Save
After setting SMTP parameters, click Save. The system automatically checks whether the parameter settings are correct. After the settings are saved, click Test. The system automatically sends a test email to the specified email address.
Test
- Log in to the OMU portal as the admin user. (
- Upload the email certificate (when TLS is enabled).
If you do not find how to obtain the certificate from the official website, obtain the certificate as follows:
- Log in to the operating system as the root user. (
 How Do I Log In to the Operating System Through a Network Port?)
 - Run the following commands:
export LD_LIBRARY_PATH=/lib64:$LD_LIBRARY_PATH
openssl s_client -connect smtp.xxx.com:25
The certificate content starts with BEGIN CERTIFICATE and ends with END CERTIFICATE, as shown in the following figure.
Figure 6-99 Obtaining the email certificate
- Copy and save the certificate content as a certificate file, for example, ca.pem.
- Upload the email certificate.
Choose , upload the certificate file saved in 3.c, and click OK.
- Log in to the operating system as the root user. (
- On the mailbox connection page, check whether SMTP server connection is successfully configured.
What Do I Do When the Account for Logging in to OMU portal Is Locked?
Symptom
A message is displayed on the OMU portal, indicating that the user account is locked.
Possible Causes
If you enter incorrect passwords for the admin user account for five consecutive times, the account is locked.
Solution
Wait for 5 minutes and enter the correct password to log in.
What Do I Do When Data on the System Disk Is Lost?
Symptom
- After the OMU portal is restarted due to an unexpected power-off, the system disk information is lost, as shown in Figure 6-100.
- Log in to the operating system and check whether system partitions are lost.In normal cases, md0 contains the md0p1, md0p2, md0p3, and md0p4 partitions.
NAME         MAJ:MIN RM   SIZE RO TYPE  MOUNTPOINT
loop0          7:0    0   128M  0 loop  /SmartFS0
sda            8:0    1   5.5T  0 disk
├─sda1         8:1    1   5.3T  0 part  /opt/SmartData_D/G0_0
└─sda2         8:2    1 186.3G  0 part
  └─md0        9:0    0 186.1G  0 raid1
sdb            8:16   1   5.5T  0 disk
├─sdb1         8:17   1   5.3T  0 part  /opt/SmartData_D/G0_1
└─sdb2         8:18   1 186.3G  0 part
  └─md0        9:0    0 186.1G  0 raid1
Possible Causes
Data on the system disk is lost due to unexpected power-off. As a result, related functions are abnormal.
Solution
- Log in to the operating system as the root user. (
 How Do I Log In to the Operating System Through a Network Port?)
 - Create partitions again.
cd /home/ivstool/init.d
parted /dev/md0
The following information in bold is the configuration:
GNU Parted 3.2
Using /dev/md0
Welcome to GNU Parted! Type 'help' to view a list of commands.
(parted) mkpart
Partition name?  []? 1
File system type?  [ext2]? ext4
Start? 1G
End? 142G
(parted) mkpart
Partition name?  []? 2
File system type?  [ext2]? ext4
Start? 143G
End? 165G
(parted) mkpart
Partition name?  []? 3
File system type?  [ext2]? ext4
Start? 166G
End? 172G
(parted) mkpart
Partition name?  []? 4
File system type?  [ext2]? ext4
Start? 173G
End? -1
(parted) q
Information: You may need to update /etc/fstab.
- Mount partitions.
mount /dev/md0p1 /opt
mount /dev/md0p2 /opt/third_algorithm
mount /dev/md0p3 /var/lib/docker
- Restart the device.
reboot
What Do I Do When I Fail to Initialize Hard Disks?
Symptom
Hard disks on the OMU portal fail to be initialized.
Possible Causes
The device functions are abnormal.
Solution
- Log in to the OMU portal as the admin user. ( Logging In to the OMU portal)
- Choose Storage > Disks.
- Click Forcibly Format.After the formatting is complete, the device automatically restarts.

- Disk formatting will delete all data from hard disks and removable disks (such as removable hard disks and USB flash drives). Before performing this operation, remove removable hard disks from USB ports to prevent data loss.
- Some data is stored on the device. Therefore, after this operation, some data can still be found, but the associated images or recordings cannot be viewed.
If you want to clear the data stored on the device, you are advised to press Reset on the device to restore the device to factory settings.
- Log in to the OMU portal again and initialize hard disks.
What Can I Do If the Login Page Is Displayed Abnormally or a Message Indicating Incorrect Password Is Displayed Upon Login?
Symptom
The following faults may occur when you attempt to log in to the OMU portal:
- The area for entering the user name and password is not displayed, as shown in Figure 6-101.
- A message is displayed on the login page, indicating that the user name must consist of 6–20 characters. After you enter the user name and password and click Log In, no response is returned, as shown in Figure 6-102.


Possible Causes
The IP address of the OMU portal is not added to trusted sites of the browser.
Solution
- Choose Tools > Internet Options > Security.
- Select Trusted site and click Site.
- Enter the IP address of the OMU portal (for example, https://10.10.10.10) in the Add this Web site to the zone text box, and then click Add.
- Click Close.
- Click OK.
- Re-log in to the OMU portal.
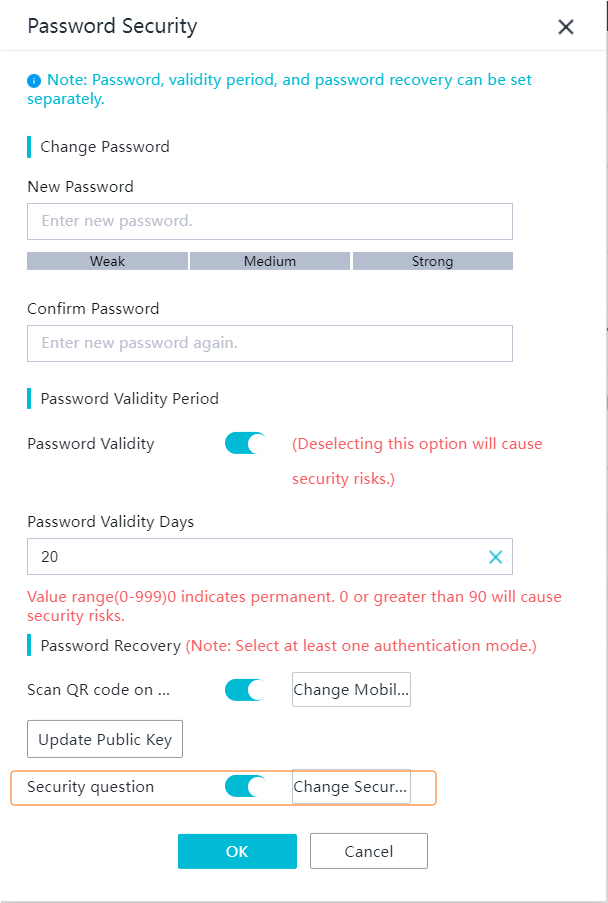
How Do I Change the Security Questions?
Context
You can set the security questions only after logging in to the OMU portal as the admin user.
Procedure (for Changing the Security Questions and Answers)
- Log in to the OMU portal as the admin user. ( Logging In to the OMU portal)
- Click admin in the upper right corner of the home page and choose Password Security. The Password Security page is displayed, as shown in Figure 6-103.
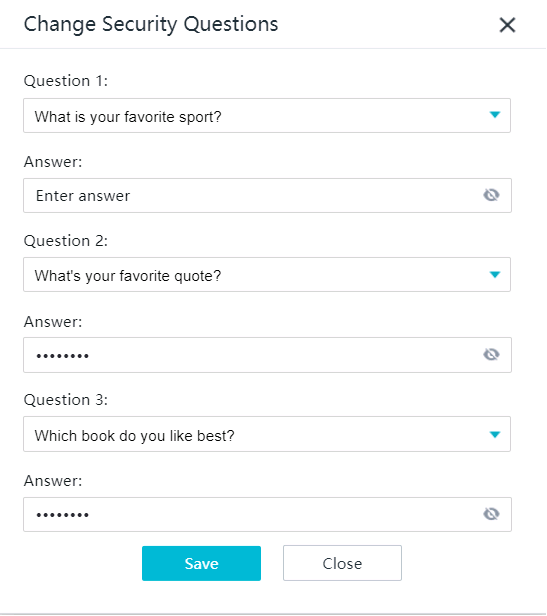
- Toggle on Security question and click Change Security Questions. The setting page is displayed, as shown in Figure 6-104.
Table 6-34 describes the specific setting rules.
Table 6-34 Parameters for changing security questions and answersParameter
Description
Change Security Questions
- You can toggle on Security question and click Change Security Questions to change the security questions and answers.
- If you toggle off Security question, the security questions and answers cannot be changed.
NOTE:- You can select preset questions or customize questions. A customized question must contain 1 to 80 bytes and cannot contain the following special characters: ~ ` ! ^ = { } | \ [ ] < > '
- For customized questions, their answers (excluding the space at the beginning) must contain 2 to 128 bytes.
- You need to set three security questions and their answers. All the security questions and their answers must be unique. The changed questions and answers can take effect only after the admin account passes authentication.
- Set security questions and authenticate the admin account to make the settings take effect.
How Do I Retrieve the System Password?
Procedure (Security Question-based Authentication)
- Log in as the admin user and click Forgot Password. The Security Question page is displayed, as shown in Figure 6-105.
Enter the correct answers to the preset security questions and click OK.
- Reset the password, as shown in Figure 6-106.
Enter a new password and confirm the password. You are advised to use a password with high complexity. For details, see Suggestions on Password Maintenance.
After the new password is set successfully, use it to log in to the system.


If no password recovery method is set, you need to reset the password by restoring factory settings. For details about how to restore factory settings, see How Do I Restore a Device to Factory Settings?.
How Do I Manually Format a Failed Disk to Rectify File System Faults?
Symptom
You are advised to perform the following steps to confirm the specific fault:
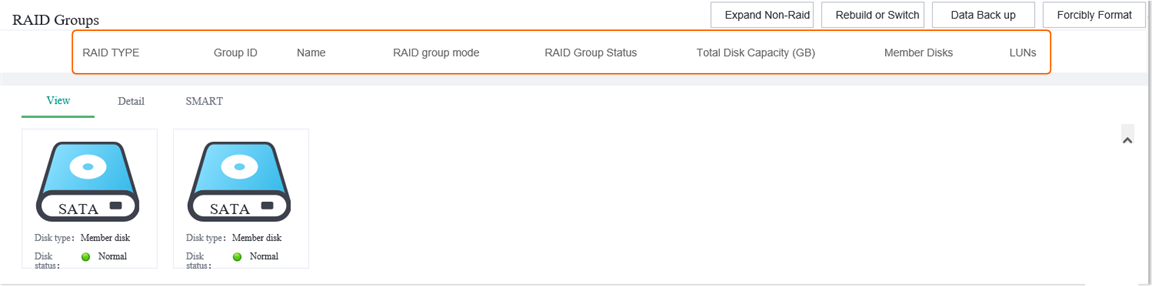
- Log in to the OMU portal, choose . On the page that is displayed, the Logical Status of a disk is Faulty, and the Physical Status of the disk is Offline, as shown in Figure 6-107.

- Log in to the iClient S100. On the iClient S100 home page, choose . On the page that is displayed, the Data disk file system error alarm exists, as shown in Figure 6-108.

- Log in to the operating system ( How Do I Log In to the Operating System Through a Network Port?) as the root user and run the following command to view logs:
cat /micro_cloud_install/log/ivstool/dev_event_report
If the command output contains "slot x kick reason:Disk fs error," a disk is removed due to a file system fault. The value x indicates the slot number of the failed disk.

Possible Causes
- Bad block existence on the metadata area of the disk
- Data corruption caused by manual execution of the dd command
- Unexpected power-off
Solution
- Troubleshoot the system for hardware issues or link faults.
- Check whether multiple disks failed.
If not, go to 1.b. If so, you are advised to stop the manual formatting process and contact technical support.
- Run the following command to check the health status of the reseated disk and check whether any errors exist in the results, such as error logs, self-check failure, or bad sectors.
smartctl -a /dev/sdx
If not, go to the next step. If so, you are advised to stop the manual formatting process and contact technical support.
- Check whether multiple disks failed.
- Log in to the OMU portal, choose , and check whether the RAID group status meets any of the following conditions:
- The RAID group is normal.
- The RAID group is degraded, with only the failed disk affected and no other failed disks detected.
- Data is being restored, and the failed disk has been replaced and becomes a hot spare disk.
If so, data can be restored after the failed disk is formatted. In this case, go to the next step. If not, data may be lost after the failed disk is formatted. In this case, contact technical support.
- Perform the following operations to manually format the failed disk.
- Create an empty manual formatting flag file.
- Log in to the operating system as the root user. ( How Do I Log In to the Operating System Through a Network Port?)
- Log in to the backend and create an empty manual formatting flag file.
touch /opt/SmartData/config/x (The value x indicates the slot number of the failed disk.)
- Log in to the operating system as the root user. (
- Select the software or hardware mode to remove and insert the disk, or restart the system. (You are advised to select the software mode. The following describes how to remove and insert a disk in software mode.)
- Obtain the device name corresponding to the slot of the failed disk.
harddiskidcfg
Figure 6-110 Device name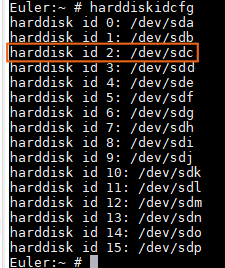
- Obtain the device ID corresponding to the failed disk.
ls -l /sys/block,
In the command output, the third field from the right is the device ID, which is presented as x:x:0:0 (for example, 0:2:0:0 in the following figure).
Figure 6-111 Device ID
- Run the following command to remove the failed disk:
echo -n "scsi remove-single-device 0:2:0:0" > /proc/scsi/scsi
- Run the following command to insert the disk:
echo -n "scsi add-single-device 0:2:0:0" > /proc/scsi/scsi
Figure 6-112 Inserting the disk
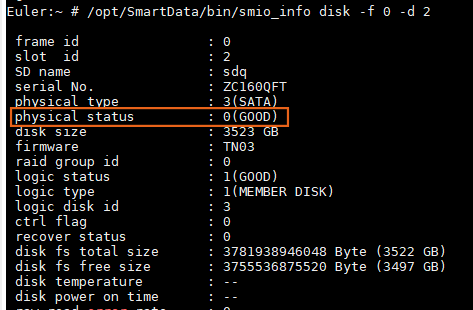
- Check whether the fault is rectified. If so, go to 6. If not, contact technical support.
- If the physical status is GOOD, the fault is rectified and the disk becomes normal, as shown in Figure 6-113.
/opt/SmartData/bin/smio_info disk -f 0 -d x (The value x indicates the slot number of the failed disk.)
- On the OMU portal, check whether the Physical Status of the disk is Normal, as shown in Figure 6-114. If so, the fault is rectified.
- If the physical status is GOOD, the fault is rectified and the disk becomes normal, as shown in Figure 6-113.
- Obtain the device name corresponding to the slot of the failed disk.
- After the fault is rectified, delete the manually created flag to prevent the disk from being automatically formatted when the file system is faulty again.
rm /opt/SmartData/config/x (The value x indicates the slot number of the failed disk.)

How Do I Install a Large Model Algorithm Package?
Context
- You can install, uninstall, upgrade, or replace large model algorithm packages on large model devices as required.
- You can install large model algorithms on the OMU portal of the HWT-IVS1800 (redirected from the iClient S100).
Procedure (Redirected from the iClient S100)
- On the iClient S100 home page, choose .
- Right-click an HWT-IVS1800 and choose Maintenance from the shortcut menu.
- Click OK. The OMU portal of the HWT-IVS1800 is displayed.
- Choose , and upload, uninstall, or replace an algorithm package as required, as shown in Figure 6-115.
Before upgrading large model algorithms, you need to check the available space of the /home directory. The available space must be greater than or equal to 600 MB. For details, see How Do I Check the Available Space of the /home Directory?.

Procedure (on the OMU Portal)
- Log in to the OMU portal as the admin user. ( Logging In to the OMU portal)
- Choose , and upload, uninstall, or replace an algorithm package as required, as shown in Figure 6-116.
Before upgrading large model algorithms, you need to check the available space of the /home directory. The available space must be greater than or equal to 600 MB. For details, see How Do I Check the Available Space of the /home Directory?.
- What Do I Do If Chinese Characters Appear on the English GUI of the OMU portal?
- What Do I Do If I Fail to Access Some Sections of the OMU portal Online Help?
- How Do I Restart Service Modules?
- How Do I Collect Fault Information?
- How Do I Check the Device Version?
- How Do I Check the Version of the Device Whose Data Is Backed up in the Data Safe?
- How Do I Configure Connection to the SMTP Server?
- What Do I Do When the Account for Logging in to OMU portal Is Locked?
- What Do I Do When Data on the System Disk Is Lost?
- What Do I Do When I Fail to Initialize Hard Disks?
- What Can I Do If the Login Page Is Displayed Abnormally or a Message Indicating Incorrect Password Is Displayed Upon Login?
- How Do I Change the Security Questions?
- How Do I Retrieve the System Password?
- How Do I Manually Format a Failed Disk to Rectify File System Faults?
- How Do I Install a Large Model Algorithm Package?