Restoring Data
Restoration Scenarios
Before restoring system data, you need to know the restoration scenarios of different restoration methods.
Fault Category |
Application Scenario |
Procedure |
|---|---|---|
Software faults |
The operating system and service software are running properly but the system is incorrectly configured. |
Restore data through the Data Safe. For details, see Restoring Data Using the Data Safe. |
The operating system is running properly, but the service software is faulty (for example, login to the LDU fails). |
Reinstall the service software and then restore the data. |
|
Hardware faults |
A hard disk is faulty. |
Replace the hard disk. For details, see Replacing HWT-IVS1800-D08/D16/E08/E16/LLM Disks. |
Other hardware components (such as mainboards or network ports) are faulty. |
Replace the subrack and then restore the data. For details, see Replacing an HWT-IVS1800-D08/D16/E08/E16/LLM Subrack. |
Restoring Data Using the Data Safe
The system can find the latest intact data from hard disks using the Data Safe to restore software packages, database files, configuration files, and recording index files.
Context

Data can be restored only for devices of the same model.
You can use the Data Safe to:
- Back up multiple copies of software packages, configuration files, database files, and recording index files to hard disks.
- Restore data in the operating system or on the OMU portal.
- Restore the database, configuration files, and recording index files of the original device after subrack replacement.
- The device version can be rolled back.
Procedure
- Log in to the OMU portal as the admin user. (
 Logging In to the OMU portal)
 - Choose .
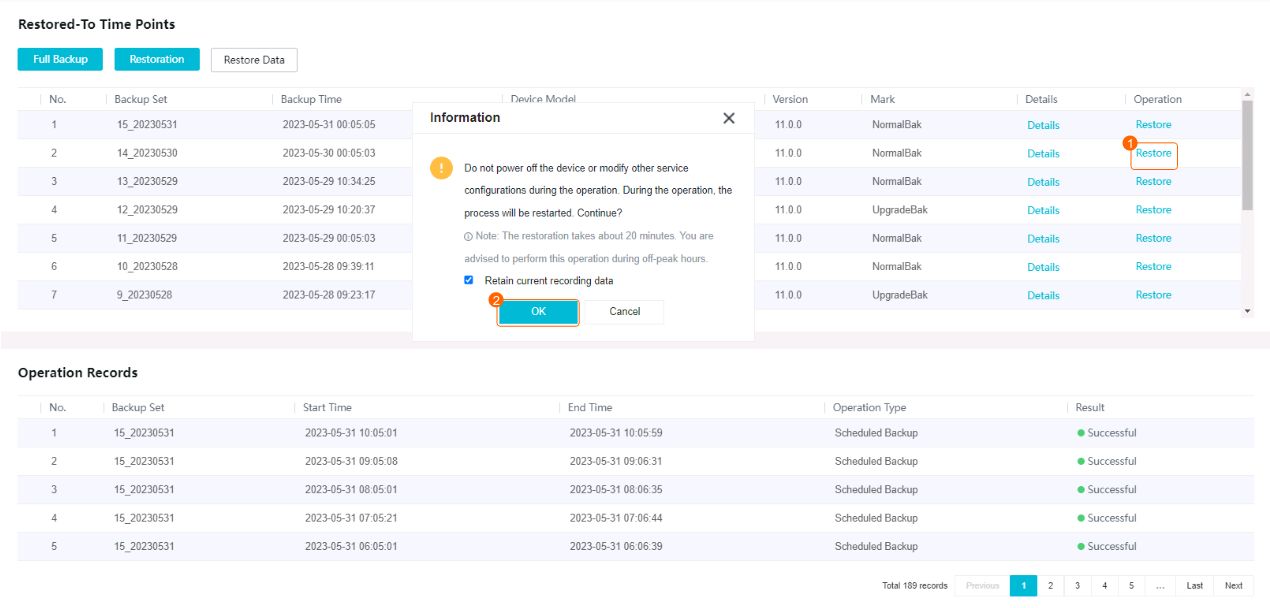
- In the list of nodes whose data can be restored, select the backup data at a certain time point and click Restore, as shown in Figure 6-29.
Table 6-9 describes the key parameters and buttons.
Table 6-9 Parameter/Button descriptionParameter/Button
Description
Full Backup
Button for backing up full data, including all system software packages, configuration files, database files, and recording index files.
NOTE:If the internal storage medium is faulty, the Data Safe stops backing up data.
Restoration
Button for restoring lost recordings due to data restoration.
For example, if the current time is 18:30:00 on December 19, 2020, you can use data generated at 16:35:50 on December 18, 2020 to restore data. After the data is restored, you can click Restoration to restore the recordings generated at the two time points to prevent recording loss.
Restore Data
Button for restoring data from the latest backup.
For example, the available time points for restoration are 2020-12-18 16:35:50 and 2020-12-18 16:41:25. If you click this button, the system restores data from the backup generated at 16:41:25 on December 18, 2020.
NOTE:If you forgot to choose to retain recording data, you can click the Restoration button to restore the recordings.
Backup Set
ID of the data set backed up.
Backup Time
Backup time.
Device Model
Basic information about a device.
Version
Details
Button for viewing basic information about all disks on the device.
Restore
Button for restoring data from the backup generated at the time specified by Restored To.
If the system displays a message indicating that the slot position is incorrect after you click Restore, insert the disk to the correct slot as prompted.
- If the current slot number is displayed as unknown, the device fails to identify the disk in the current slot. The possible cause is that the disk is not inserted or is damaged. In this case, you need to insert the disk to the correct slot as prompted.
- If the correct slot number is displayed as empty, the new disk is inserted into an incorrect slot. In this case, you need to insert the new disk into a vacant slot (the correct slot number is not displayed) or remove the disk.
NOTE:- If the electronic label of the device backed up in the Data Safe is inconsistent with that of the device whose data is to be restored, the restoration will fail. In this case, you are not allowed to restore data.
- The target version after the upgrade retains even if you restore to factory settings.
- If you add or delete cameras after the upgrade, the camera changes do not take effect after the restoration. The camera information in the backup set is still used.
- Enter the password of the current login user and click OK to verify the password.
The system automatically restores data in the following way:
- The PWR indicator on the front panel turns from steady green to steady yellow, and the buzzer produces two beeps (for two seconds in total).
In this case, the device starts to restore data.
- About 10 minutes later, the PWR indicator on the front panel turns from steady yellow to steady green, and the buzzer produces three beeps (for 3 seconds in total).
In this case, the data restoration is complete.

- During data restoration, do not perform operations such as service configuration. Additionally, ensure that the device is not powered off during data restoration because the system will automatically restart processes during data restoration. If the device is powered off unexpectedly, rectify the fault by referring to Unexpected Power-off During Data Restoration.
- During cross-version data restoration, if the device is powered off for more than three times, the restoration will fail, the buzzer will buzz, and the device will fail to start services. In this case, rectify the fault by referring to Unexpected Power-off During Data Restoration
- The PWR indicator on the front panel turns from steady green to steady yellow, and the buzzer produces two beeps (for two seconds in total).
- After the data is restored, manually check whether the data is successfully restored.
- Log in to the OMU portal as the admin user.
- Choose .
- In Operation, check whether data is successfully restored.
- If the restoration fails, you can click Restoration to restore the recordings.